# Tableau Server
## Requirements
* REST API and Metadata API enabled
* A valid Personal Access Token
* [Tableau Server version 2020.4.6](https://www.tableau.com/support/releases/server/2020.4.6#esdalt) (build number 20204.21.0618.0842) or later. If you need to upgrade your Tableau Server, here are a few helpful links:
* [Preparing for Upgrade](https://help.tableau.com/current/server-linux/en-us/server-upgrade-prepare.htm)
* [Upgrading from 2018.1 and Later (Linux)](https://help.tableau.com/current/server-linux/en-us/sug_plan.htm)
## 1. Enable REST API and Metadata API
Tableau's [REST API](https://help.tableau.com/current/api/rest_api/en-us/REST/rest_api_requ.htm) and [Metadata API](https://help.tableau.com/current/api/metadata_api/en-us/index.html) **must** be enabled in order to see Tableau metadata in Select Star.
The REST API is permanently enabled for Tableau Cloud, and is enabled by default on all supported versions of Tableau Server.
To enable the Metadata API, a server admin must enable the Metadata API on Tableau Server using the `tsm maintenance metadata-services enable` command through the Tableau Services Manager (TSM) command line interface (CLI). For more information, see [Tableau Documentation](https://help.tableau.com/current/api/metadata_api/en-us/docs/meta_api_start.html#enable-the-tableau-metadata-api-for-tableau-server).
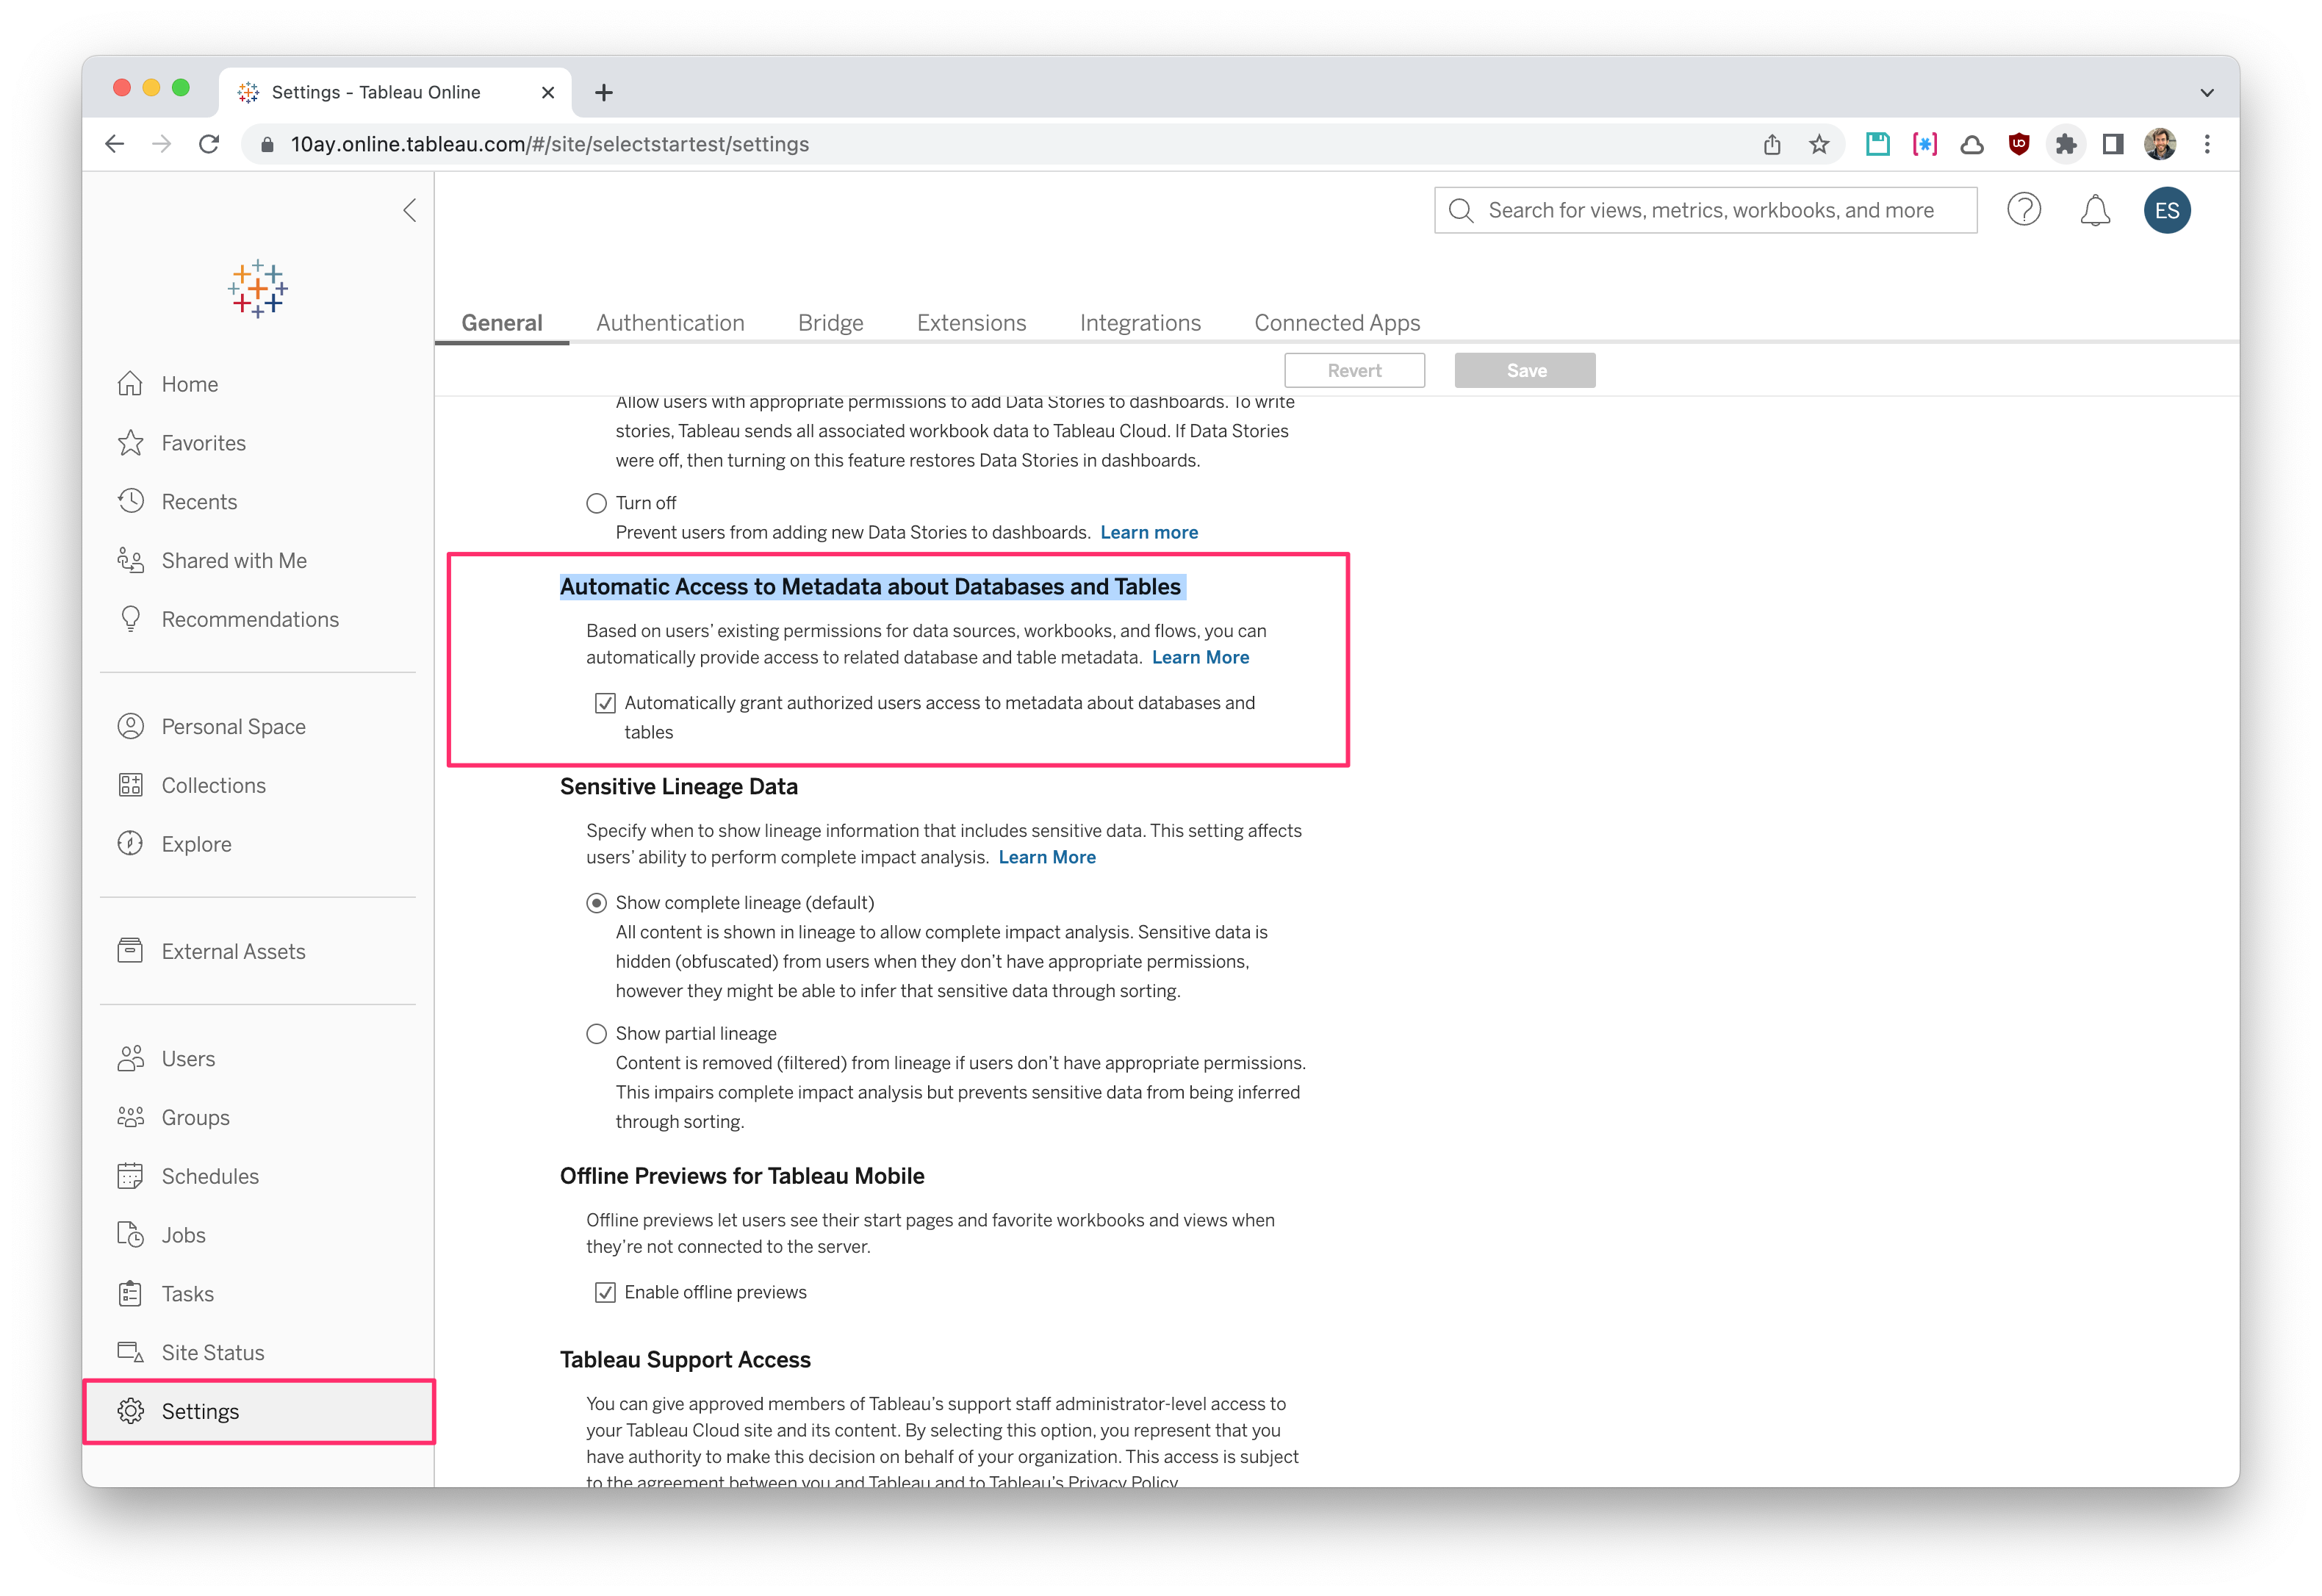
For both Tableau Cloud and Tableau Server, go to **Settings > Automatic Access to Metadata about Databases and Tables**, and make sure the checkbox is checked.
Automatic Access to Metadata about Databases and Tables
{% hint style="info" %}
**Tableau Cloud** can take some time to populate the Metadata Database if you have a big amount of Workbooks in Tableau Cloud.
{% endhint %}
## 2. Create a Personal Access Token
Navigate to **My Account Settings** on the top right of the screen.

Scroll down to **Personal Access Tokens**.
Enter a name for your token and click **Create new token.**
{% hint style="info" %}
The user you connect to with Select Star needs a **Site Administrator Explorer** role at minimum in order for Select Start to retrieve all the necessary metadata from the Tableau API.
{% endhint %}

Copy the **Token Secret** from the popup and store it somewhere safe. You will need it later on during this setup.
## 3. Grant access to Tableau Server database (Tableau Server)
{% hint style="info" %}
**Tableau Server**: This step is only applicable if you have a Tableau Server instance. Jump to Step 4 if you are connecting Tableau Cloud.
{% endhint %}
Tableau Server uses an [External Repository](https://help.tableau.com/current/server/en-us/server_external_repo.htm) to store *data about all user interactions, extract refreshes, and more*. **Select Star needs access to this External Repository in Postgres** to properly generate lineage and popularity for Tableau and its data sources.
To provide access, create a new database user with access to all of the following tables in the `public` schema (table and row level):
* public.hist\_users
* public.hist\_views
* public.historical\_events
* public.system\_users
* public.users
* public.views
{% hint style="warning" %}
Note for advanced Postgres setups with **Row-Level Security (RLS)**
\
If your PostgreSQL instance has Row-Level Security (RLS) enabled on any of the above tables (e.g. users, views), the new user may not see any data — even with SELECT permissions.
```
-- Check if RLS is enabled
SELECT relname, relrowsecurity FROM pg_class WHERE relname IN ('users', 'views');
```
In that case, you’ll need to grant access at the row level by adding a policy like:
```
-- For the users table
CREATE POLICY selectstar_users_access
ON public.users
FOR SELECT
TO selectstar_user
USING (true);
-- For the views table
CREATE POLICY selectstar_views_access
ON public.views
FOR SELECT
TO selectstar_user
USING (true);
```
{% endhint %}
{% hint style="info" %}
If your PostgreSQL External repository is located in a private network (Firewalls, SSH, VPN, etc), we also offer the option to sync this information from Snowflake. All we need is the same information transferred to your Snowflake instance.
Contact if you have any questions regarding this step.
{% endhint %}
## 4. Create a Tableau Data Source
1. Go to the Select Star **Settings > Data**
2. Click **+ Add** to create a new Data Source.
Fill out the set up form with the information as outlined below.
* **Display Name:** Give your data source a meaningful name, the default is Tableau.
* **Access Token Name:** The Personal Access Token Name.
* **Access Token Secret:** The Personal Access Token Secret.
* **Base Url:** The main URL for your site, such as `https://10ax.online.tableau.com`
* **Site Id:** The name of your site in tableau. You can extract this from the URL you access in Tableau. Example, ***analytics*** is the name of the site for the URL `https://10ax.online.tableau.com/#/site/analytics/home`.
Click the **Connect** button at the bottom of the modal.
## 5. Connect Tableau External Repository (Tableau Server)
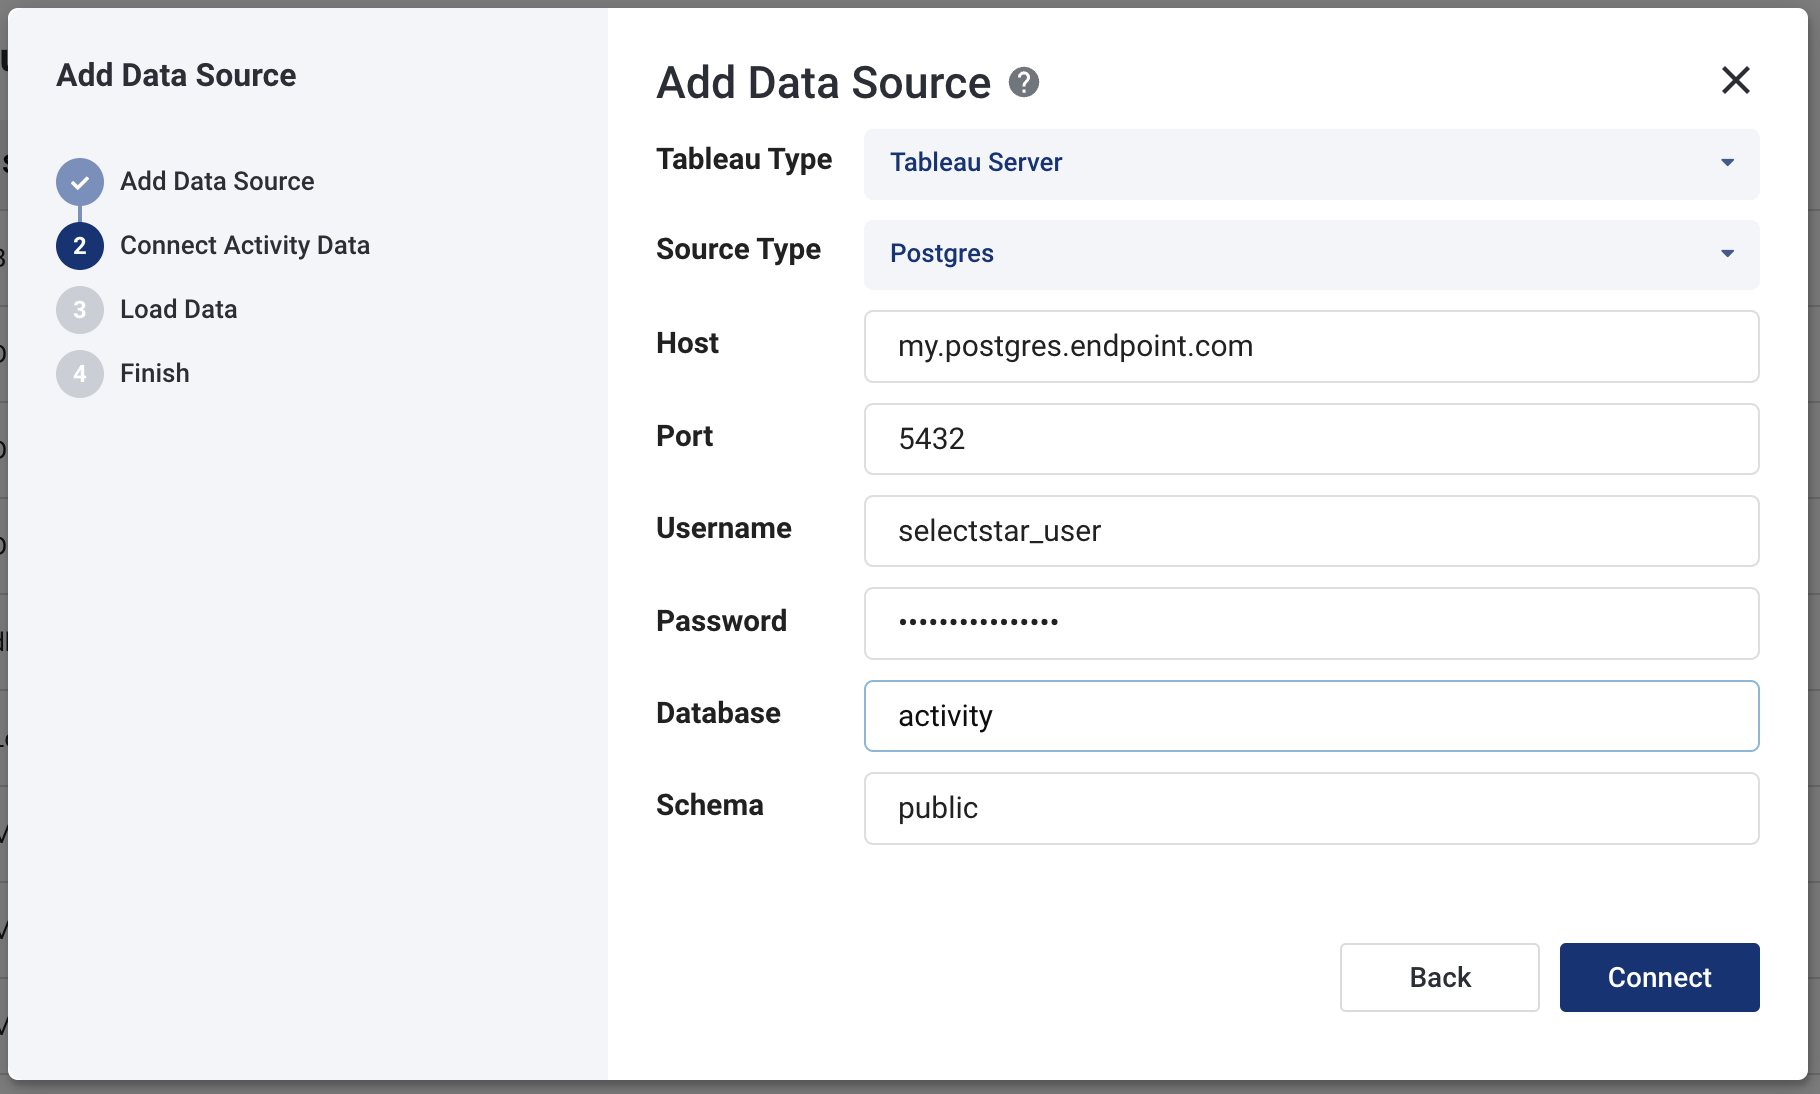
To connect Tableau External Repository, use the details of the user, database, and schema that you granted access to in Step 3 for Tableau Server. Select Star will connect to
Introduce the details in the setup form as shown in the example below.
{% hint style="info" %}
**IP Whitelisting**\
For any instance located in a private network, you must either
* whitelist the following two IP addresses to connect Select Star: `3.23.108.85`, `3.20.56.105`
* Configure the External Repository exporting your activity data to Snowflake. Reach out to for more information about this step.
{% endhint %}
Your metadata should start loading automatically. Please allow 24-48 hours to completely generate popularity and lineage.
When the sync is complete, you'll be able to explore Tableau in Select Star. See the link below for more information on Tableau in Select Star.
%20(1)%20(4).png?alt=media)